AI Outfit Generator: Build Your Virtual Fashion Brand Ambassador
Building a fashion brand requires more than great designs—you need a face. But hiring models for every ai clothing design campaign, every season, and every product variation is expensive and logistically complex.
What if you could create a digital brand ambassador once, and reuse them forever? This guide walks you through a 3-step Grid Canvas workflow to build a complete virtual fashion model library: from initial character creation to a versatile sheet of poses and angles, ready to be dressed in any ai outfit generator style for any scene.
The Challenge: The Model Dependency
Fashion brands face a critical bottleneck:
- Scheduling conflicts with human models
- Inconsistency when switching models between campaigns
- High costs for reshoots when you need a new angle
- Scalability limits when launching in new markets
The Solution: Create your own AI model library—a consistent virtual brand ambassador that you control completely.
The Workflow: From Concept to Complete Model Sheet
We will build a reusable character asset that can be deployed across your entire marketing ecosystem.
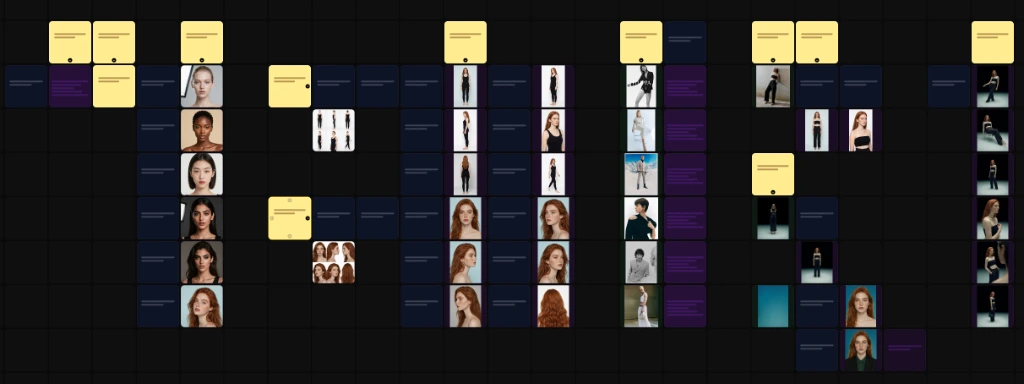
Step 1: Character Definition & Brainstorming
Every great model starts with a vision. In this step, we define who your brand ambassador is.
The Process:
- Open Grid Canvas.
- Create a Prompt Cell describing your ideal model: Demographics: "28-year-old East Asian male" Features: "Strong jawline, short textured hair, warm skin tone" Vibe: "Athletic build, confident posture, approachable expression"
- Generate multiple variations to explore options, or let AI help you explore the possible directions with GPT-5.2 vision which can handle brainstorming too.
- Select the one of the best one that matches your brand and use it in the following steps.
Pro Tip: Use one photo to best represent the model and use it as a starting point for the next step.
Step 2: The Model Sheet Creation
Now we build the reference library. Like traditional model comp cards, we need multiple angles.
Goal: Create a comprehensive model sheet with full-body and headshot variations from multiple angles.
The Technique: Using the selected character reference from Step 1, we generate a standardized set of views:
Full Body Shots:
- Front view (neutral stance)
- 3/4 view (dynamic angle)
- Side profile
- Back view
- Upper body
- Walking motion
Headshot Close-ups:
- Front face
- Left profile
- Right profile
- 3/4 from both direction
- Back
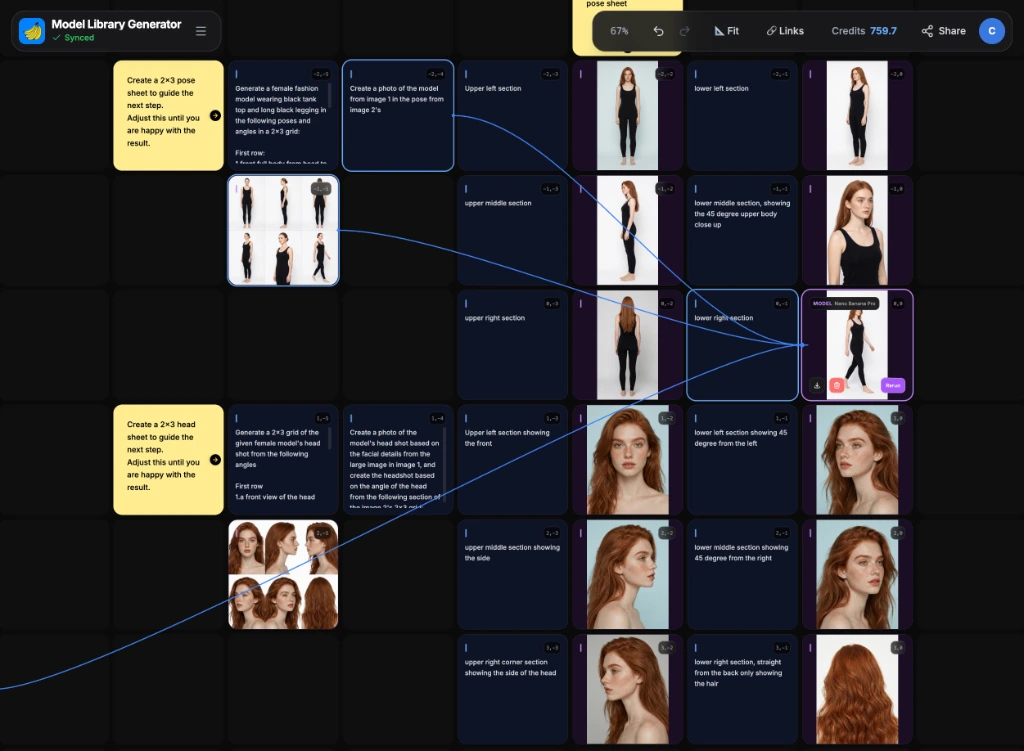
The Setup: Create parallel Model Cells on your canvas, each referencing the same base character but with angle-specific prompts. Use a neutral light background to ensure distraction for future use.
Notice in the screenshot below, there is a 2x3 grid generated before the larger seperate version, this allows us to create the models in one single context to ensure consistency on details other than the face.
Why this matters: This sheet becomes your "source of truth." Any future generation of this model will reference these images to maintain consistency.
Step 3: Outfit & Scene Integration
With your model library established, we now dress them and place them in environments.
Goal: Generate campaign-ready images combining your model, outfits, and scenes.
The Process:
-
Prepare Outfit References: Upload or generate your clothing items (flat lays or on-mannequin shots work best).
-
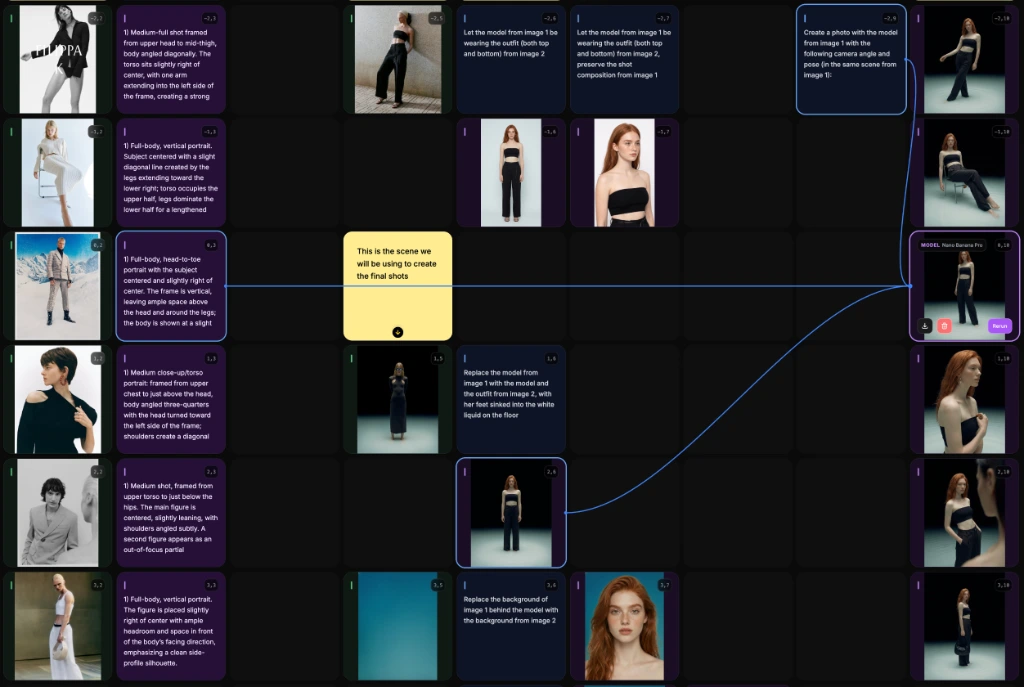
Define Scene/Style: either use references or create your own scenes from scratch. To create with references, replace the images on the left of the screenshot below, and use GPT-5.2 vision to extract the pose and shot composition.
-
Merge Elements: Create Model Cells that take inputs from:
- Your Model in the target outfit which is created based on the outfit reference
- Your scene made from reference or created from scratch
- The description prompt extracted from references
The Result: A full set of consistent campaign images featuring your virtual model in your designs, across different poses and environments.
Scalability: Once this workflow is established, creating a new campaign is simply a matter of:
- Swapping outfit references
- Changing the environment reference
- Clicking "Generate"
Your model remains consistent, your costs stay low (around $2-3 per full campaign), and your speed increases exponentially.
Why Build a Model Library?
- Perpetual Usage: Your model never ages, never gets booked elsewhere, and never has scheduling conflicts.
- Brand Consistency: The same face across all campaigns builds recognition.
- Infinite Flexibility: Change outfits, scenes, and seasons without photoshoot logistics.
- Global Scalability: Deploy your brand ambassador across markets instantly.
Get Started
Ready to create your digital brand ambassador? Open Grid Canvas today and build your Model Library to unlock unlimited campaign potential.
Grid Canvas Basics
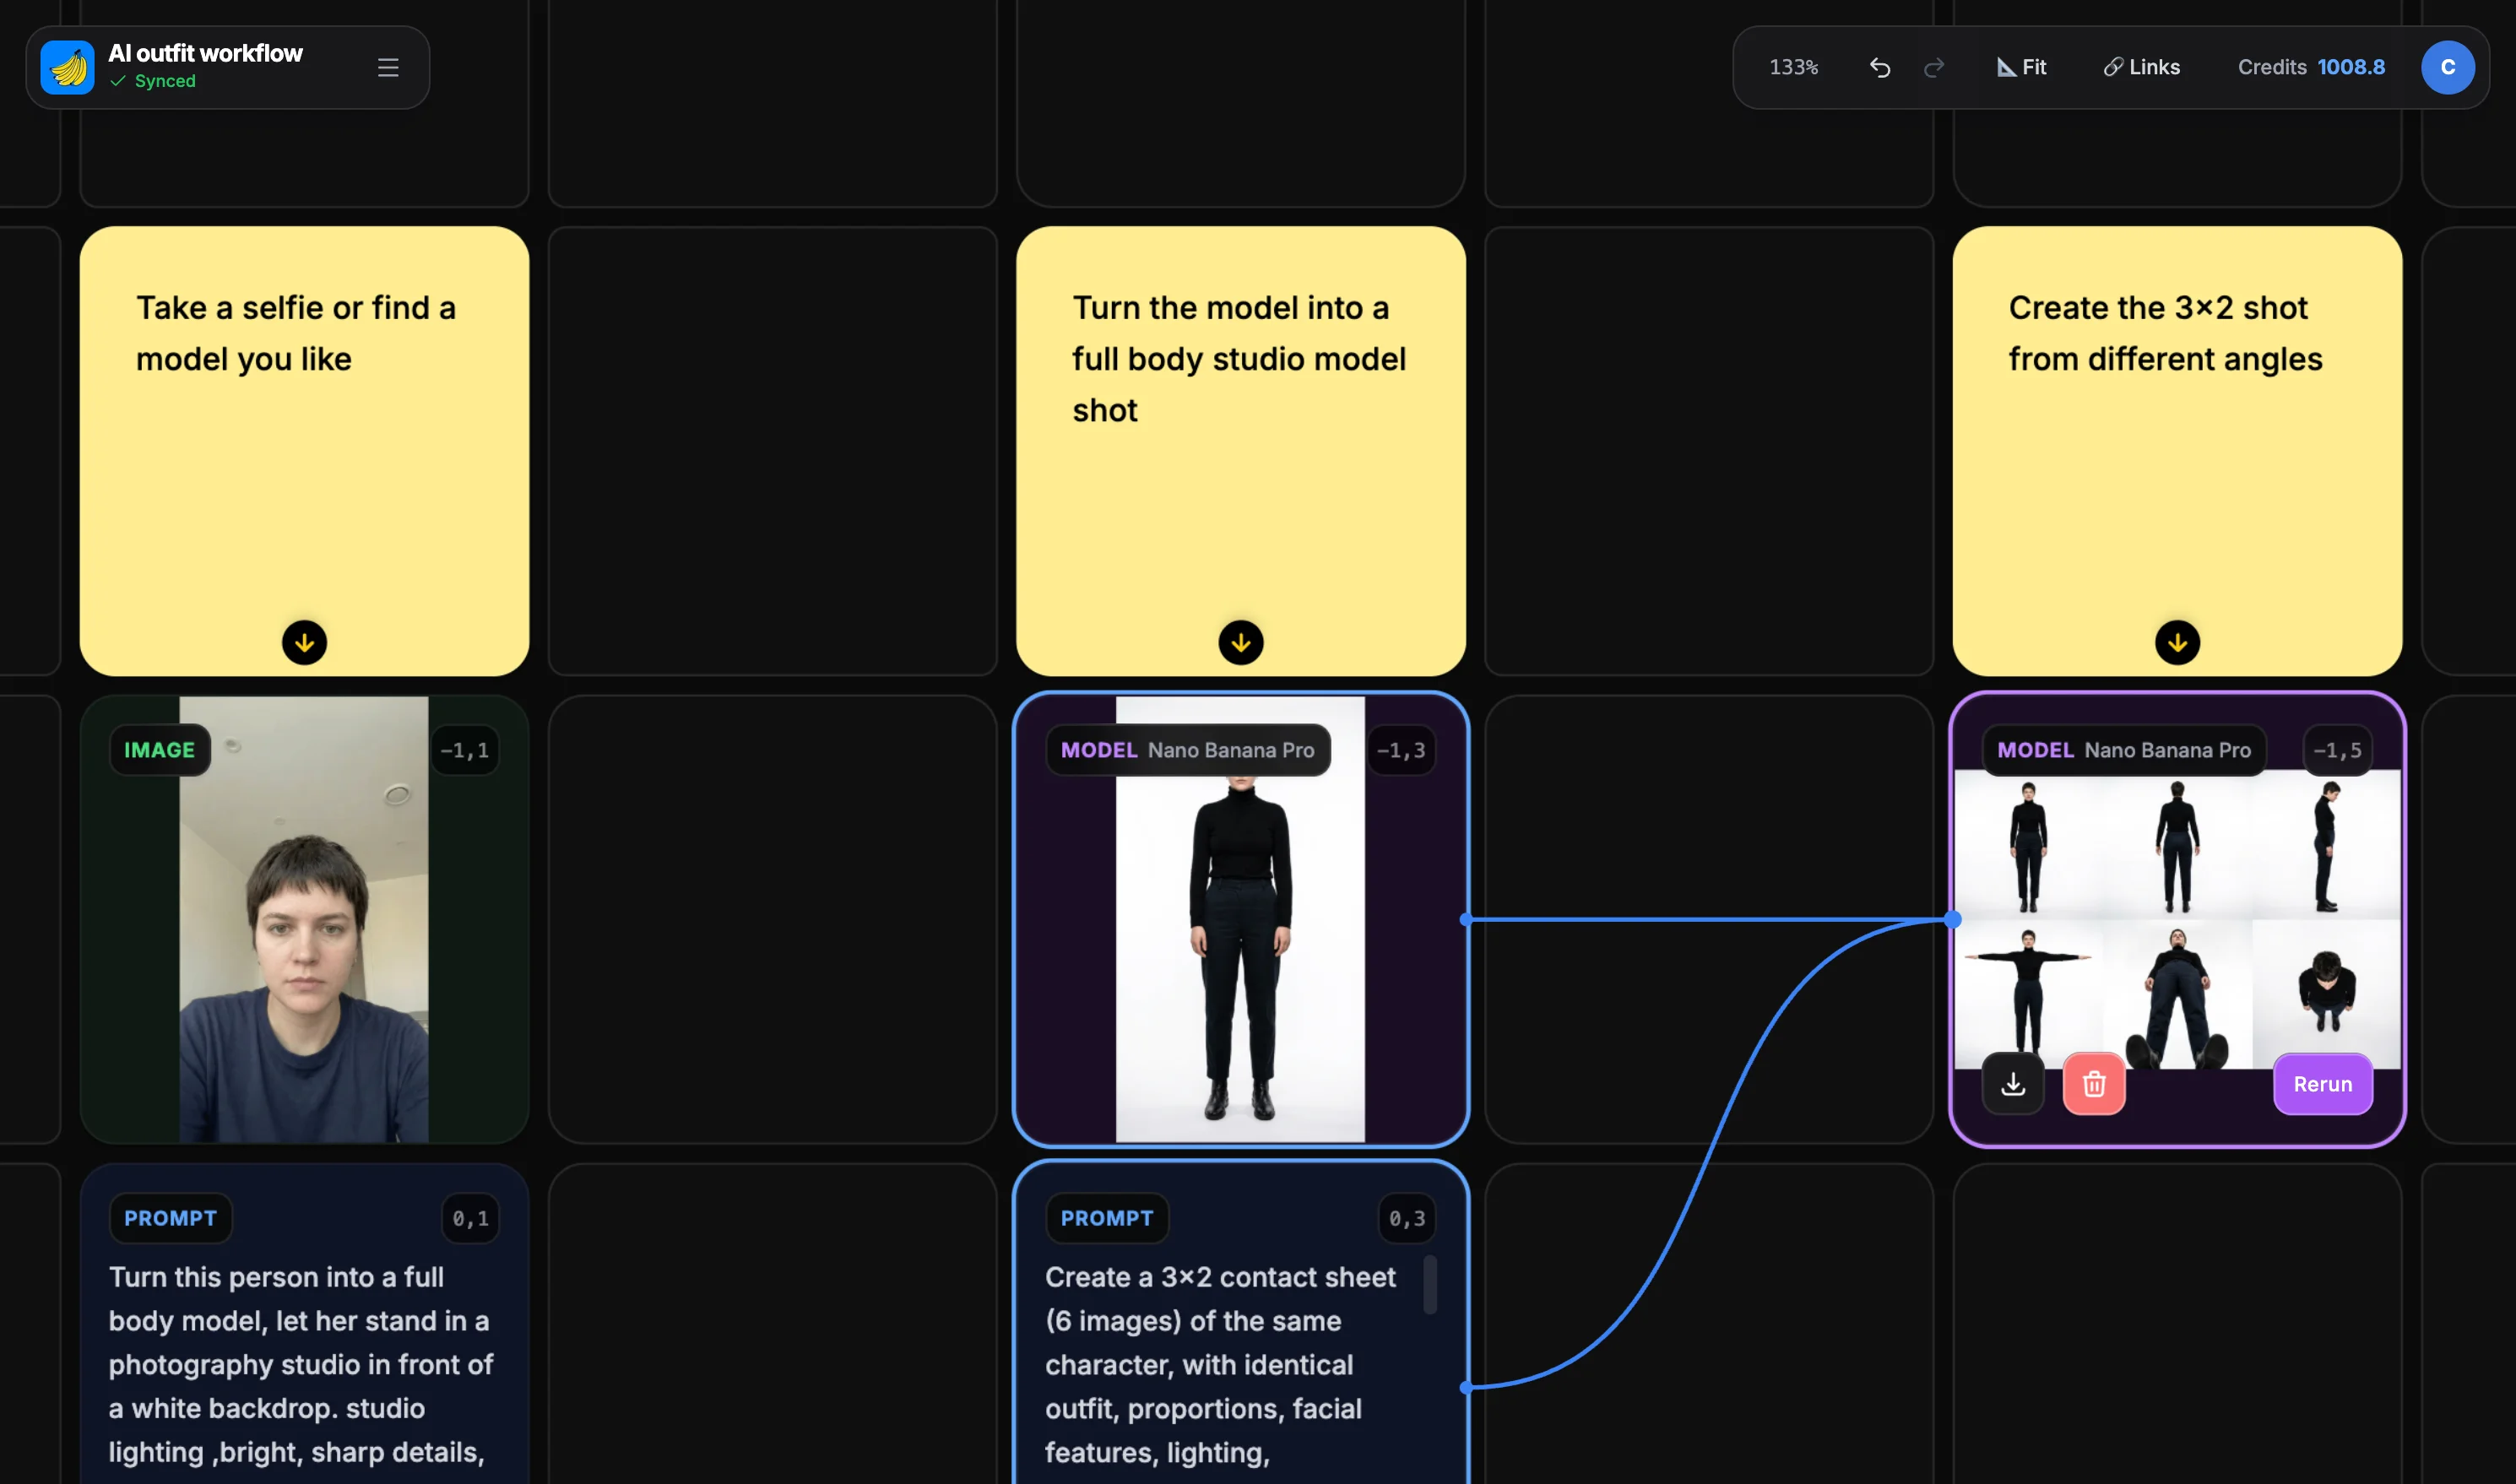
If you are new to Grid Canvas, here is a quick primer on how the system works. Unlike a linear chat, the canvas uses a node-based workflow similar to professional design tools.
The Building Blocks: Cells
The canvas is built from Cells, which act as containers for different types of information:
- Prompt Cells: These store your text instructions (e.g., "Front view, athletic male model"). You can link one prompt cell to multiple model cells to enforce consistent styling.
- Model Cells: These are the engines that generate images. They take inputs (prompts, reference images) and produce visual outputs.
- Image Cells: These hold your generated images or uploaded references. You can link an image cell into a model cell to use it as an image-to-image reference.
Connections & Flow
The power of Grid Canvas lies in Connections. You don't just type and wait; you build a pipeline.
- Reference Chaining: Output from your character brainstorm becomes input for your model sheet generation.
- Multi-Reference Merging: Combine your model sheet, outfit images, and environment prompts in a single generation.
- Batch Generation: Run multiple angle variations simultaneously.
This spatial organization allows you to see your entire creative logic at a glance, making complex workflows like the Model Library Generator possible.
What's great about Banana Designer's grid canvas is that it supports post-it notes on the canvas, and you can write down notes next to your workflow and use the canvas like a notebook to help you track your progress or configurations.
Related Resources
Expand your AI fashion capabilities with these guides:
- AI Fashion Campaign – Scale your model library into full seasonal campaigns.
- AI Fashion Workflow – Learn consistent character generation techniques.
- AI Flat Lay Photography – Create product shots to complement your model campaigns.
- Prompt Composer – Master descriptive prompts for character consistency.
